一、认证组件介绍 1. 用户认证的作用 在开发后端 API 时,要考虑不同的功能会有不同限制的场景,例如:
无需认证,就可以访问并获取数据(游客模式)
需认证,用户先登录,后续发送请求要携带登录时发放的凭证
django 中可以借鉴装饰器、中间件等对所有接口执行之前先进行用户身份认证。drf 中直接提供了用户认证的组件,可以帮助我们快速高效的完成用户身份识别功能。
2. 认证组件的使用 2.1 编写认证类 一般功能性的组件不会跟业务代码放在一起,我们可以单独新建一个文件或者目录,存放我们自己编写的组件。
1 2 3 4 5 6 7 8 9 10 11 12 13 14 15 16 17 18 19 20 21 22 23 24 25 from rest_framework.authentication import BaseAuthenticationfrom rest_framework.exceptions import AuthenticationFailedfrom app01.models import UserInfoclass UserTokenAuth (BaseAuthentication ):def authenticate (self, request ):"token" , "" )if not token:raise AuthenticationFailed({"code" : 1002 , "error" : "认证失败" })filter (token=token).first()if not user_obj:raise AuthenticationFailed({"code" : 1002 , "error" : "认证失败" })return user_obj, tokendef authenticate_header (self, request ):return 'Bearer realm="API"'
认证类的使用要注意以下几点:
认证类必须继承 rest_framework.authentication.BaseAuthentication 类,且必须实现类中 authenticate 方法,该方法实现的就是认证的功能。authenticate_header 方法可以不用实现;
对于认证失败的情况,要用 rest_framework.exceptions.AuthenticationFailed 类抛出异常;
认证通过后,最后会返回两个值,两个值会分别赋值给 request.user 和 request.auth ,即可以在业务接口中直接查询访问的用户信息。
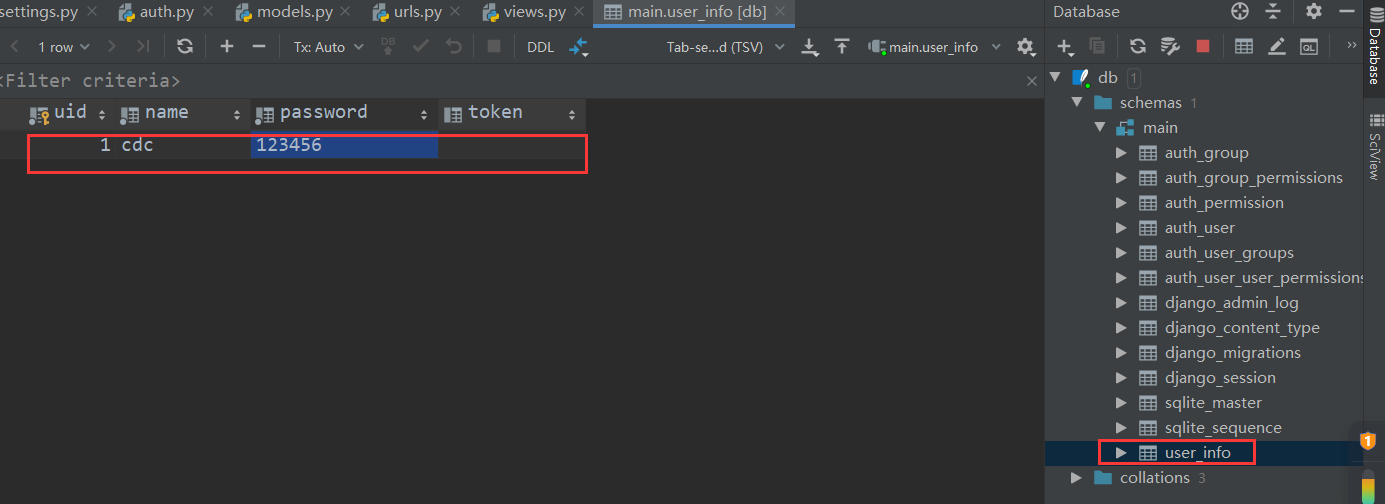
2.2 编写数据表模型 我们简单创建一张用户表,用于存储用户相关信息。当用户登录时,后端生成一个随机的 token 值,并将值存入表中。
1 2 3 4 5 6 7 8 9 10 11 12 13 14 15 16 from django.db import modelsclass UserInfo (models.Model):True , verbose_name="用户ID" )10 , verbose_name="用户名" , null=False )16 , verbose_name="用户密码" , null=False )32 , verbose_name="用户登录token" , null=True )def __str__ (self ):return self .nameclass Meta :"user_info"
创建完表模型后,执行数据库迁移命令(这里直接使用 sqlite 数据库)
1
2
3
4
表生成以后手动插入一条数据
2.3 路由 创建两条路由,一个用于用户登录,另一个用于查看商品信息
1 2 3 4 5 6 7 8 9 from django.urls import pathfrom app01 import views'api/v1/login/' , views.UserLoginView.as_view()),'api/v1/product/' , views.ProductManage.as_view()),
2.4 编写视图类 1 2 3 4 5 6 7 8 9 10 11 12 13 14 15 16 17 18 19 20 21 22 23 24 25 26 27 28 29 30 31 32 33 34 35 36 37 38 39 40 41 42 43 44 45 46 47 48 49 import uuidfrom rest_framework.views import APIViewfrom rest_framework.response import Responsefrom app01.models import UserInfofrom app01.auth import UserTokenAuthclass UserLoginView (APIView ):def post (self, request, *args, **kwargs ):"username" , "" )"password" , "" )filter (name=user_name, password=pwd).first()if not user_obj:"code" : 1001 , "error" : "用户名或密码错误" }return Response(ret_data)str (uuid.uuid4())"code" : 1000 ,"data" : {"user" : user_name,"token" : user_tokenreturn Response(ret_data)class ProductManage (APIView ):def get (self, request, *args, **kwargs ):"id" : 1 , "title" : "mate30" , "price" : 3000 },"id" : 2 , "title" : "mate40" , "price" : 4000 },"id" : 3 , "title" : "mate50" , "price" : 5000 },return Response(product_list)
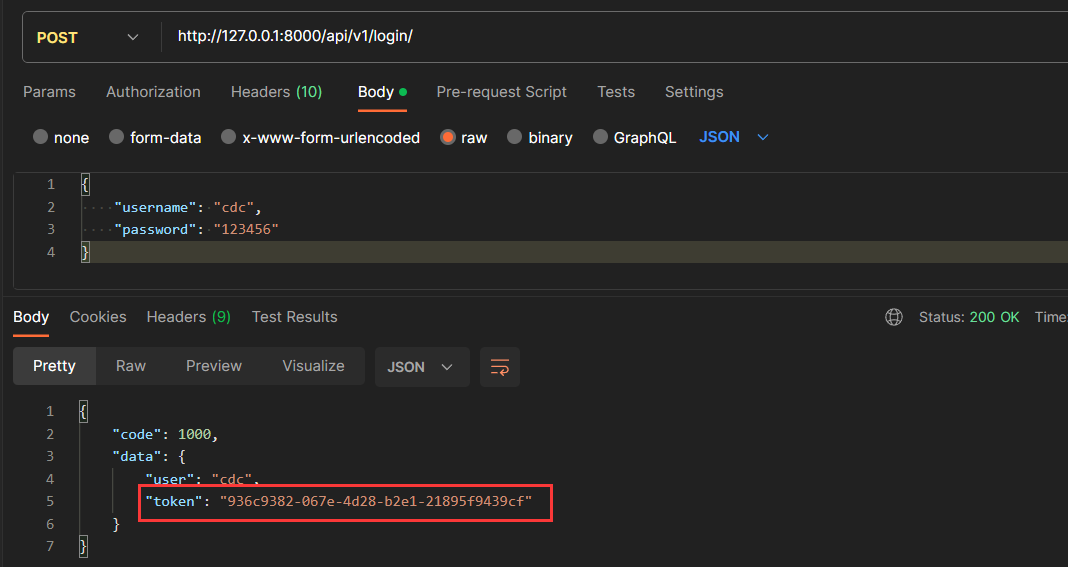
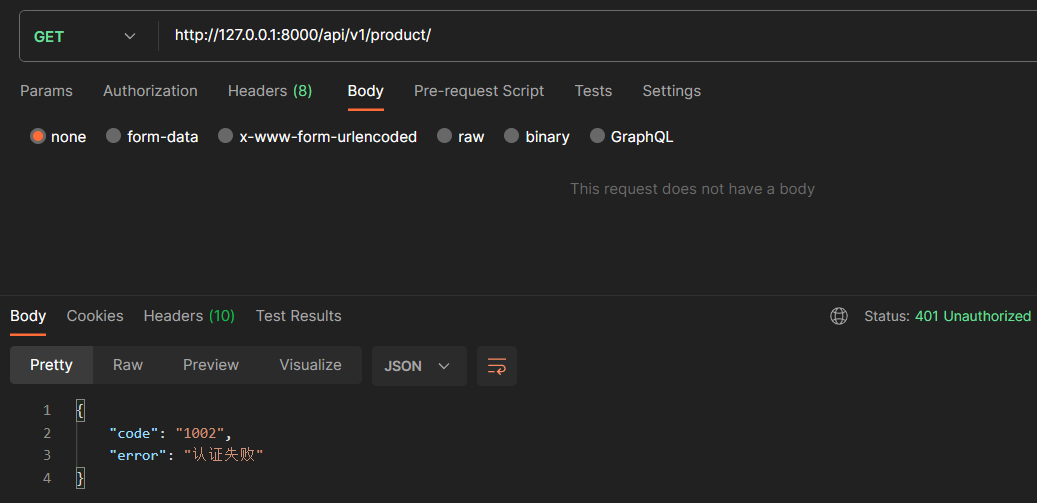
上述两个视图类,UserLoginView 为用户登录接口,无需进行身份验证;ProductManage 类为查看商品信息,只有认证通过即登录过的用户才能请求看到数据。
2.5 用户认证校验
用户先进行登录操作,拿到后端接口返回的 token 信息
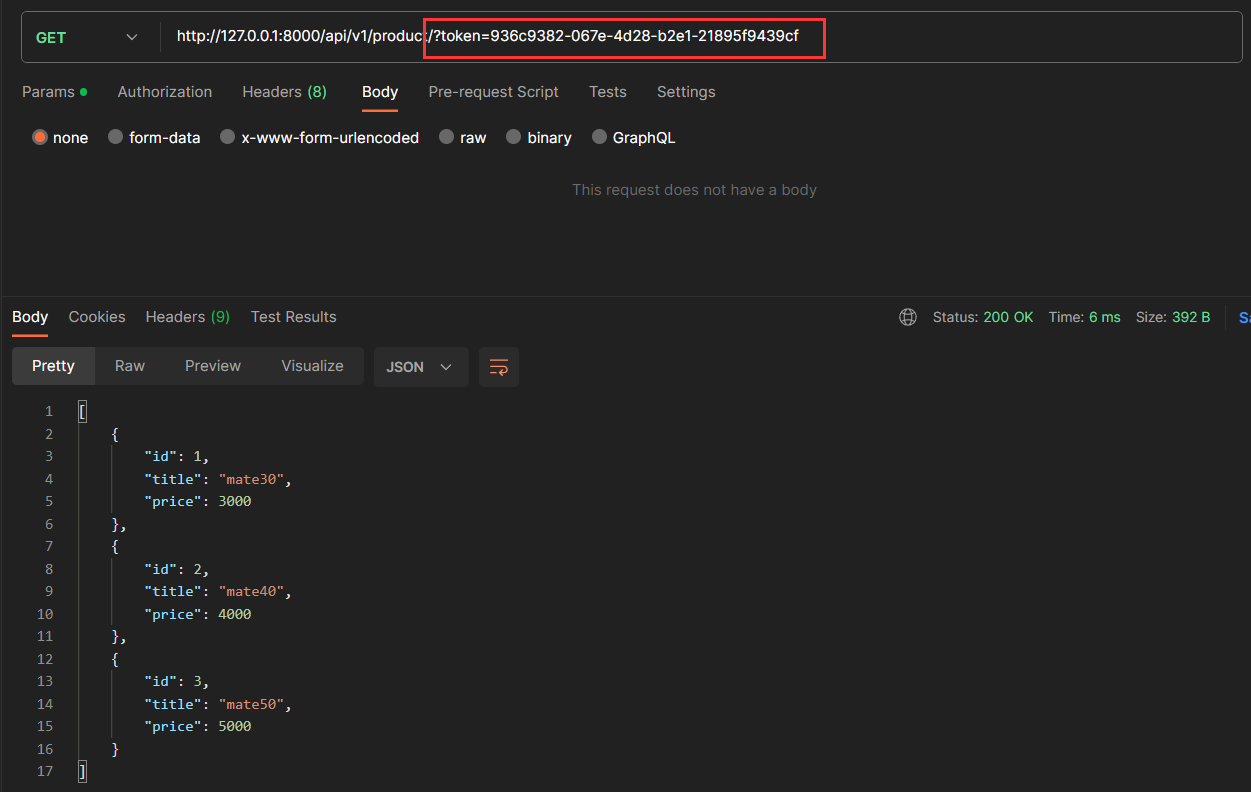
访问查询商品接口时,路由未携带 token,请求认证不通过
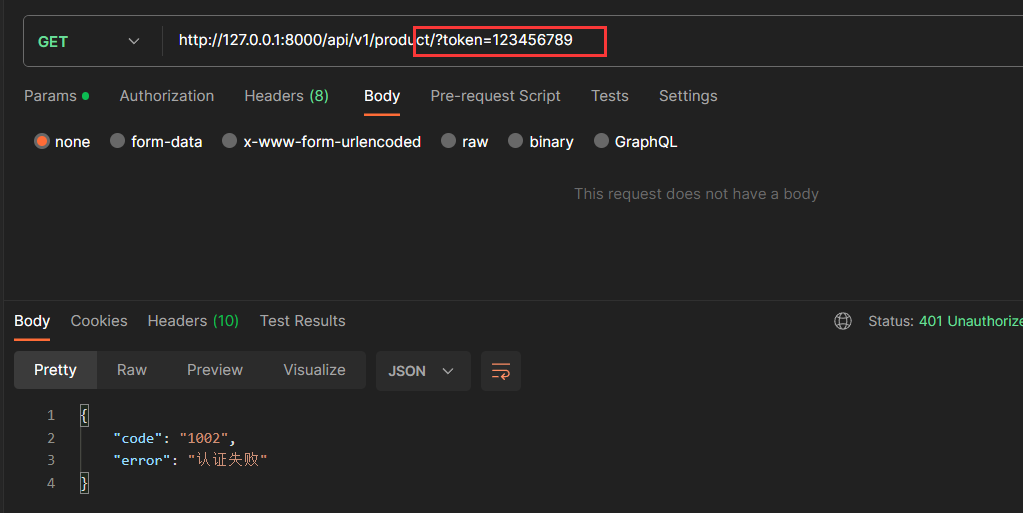
访问查询商品接口时,路由携带 token 值不正确,请求认证不通过
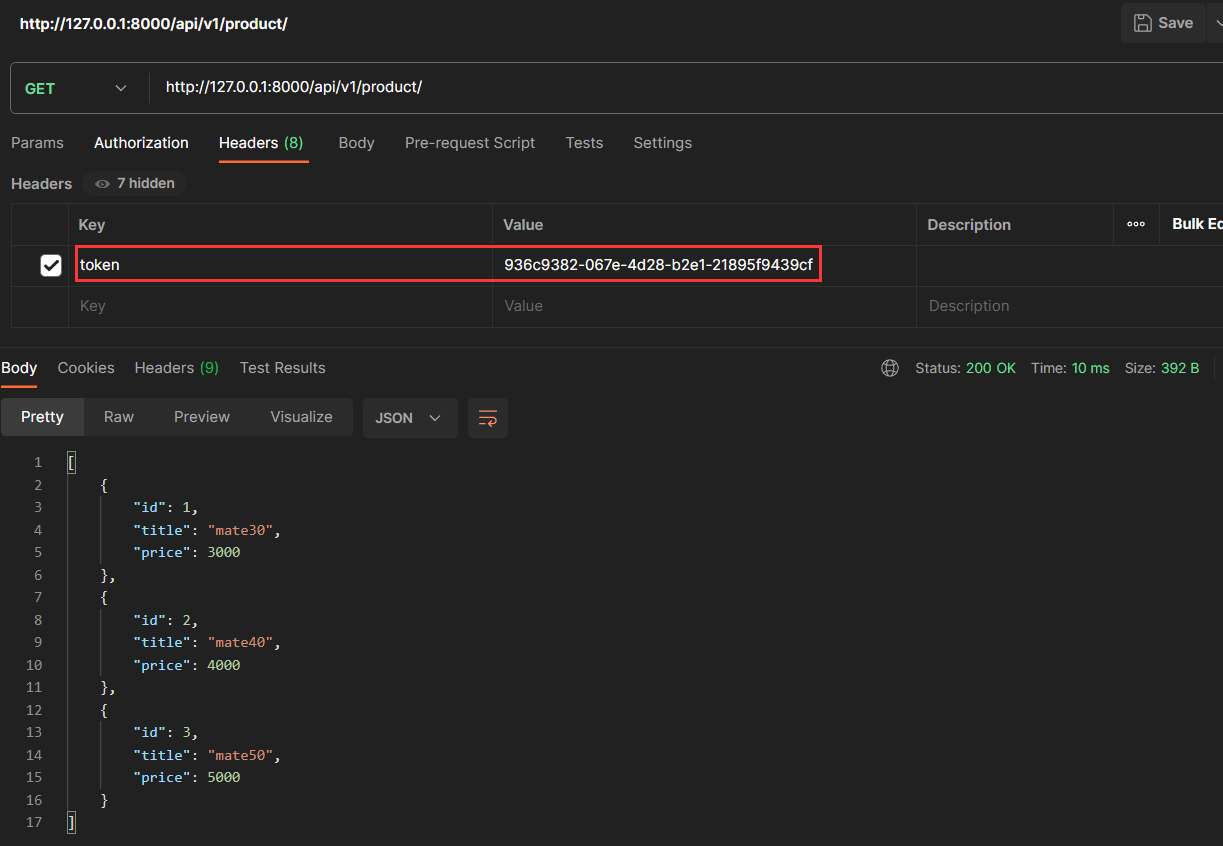
访问查询商品接口时,路由携带正确的 token ,请求认证通过,后端返回商品信息
2.6 认证组件的全局使用 1 2 3 4 5 6 7 8 "DEFAULT_AUTHENTICATION_CLASSES" : ["app01.auth.UserTokenAuth" , ]
设置好全局配置后,需要经过认证的视图类中就不用再配置 authentication_classes ,而针对于不想使用认证的视图类,只需要设置 authentication_classes = [] 即可
1 2 3 4 5 6 7 8 class UserLoginView (APIView ):def post (self, request, *args, **kwargs ):pass
二、多个认证类 1. 多个认证类的使用 在实际的开发场景中,一个 api 可能被多方调用(PC端、App、小程序等等),各方使用的认证方式可能也不一样,我们的接口应该尽量兼容各种认证情况。
在视图类的 authentication_classes 中定义认证类时,传入的是一个列表,这就意味着 drf 是支持定义多个认证类的。当出现多个认证类时,drf 内部会按照列表的顺序,逐一执行认证类的 authenticate 方法,如果返回元组或抛出异常则会终止后续认证类的执行;如果返回 None,则会继续执行后续的认证类。
1 2 3 4 5 6 7 8 9 10 11 12 13 14 15 16 17 18 19 20 21 22 23 24 25 26 27 28 29 30 31 32 33 34 35 36 37 38 39 40 41 42 43 44 45 46 47 48 49 50 51 52 53 54 55 from rest_framework.authentication import BaseAuthenticationfrom rest_framework.exceptions import AuthenticationFailedfrom app01.models import UserInfofrom rest_framework.authentication import BaseAuthenticationfrom rest_framework.exceptions import AuthenticationFailedfrom app01.models import UserInfoclass UserTokenAuth (BaseAuthentication ):""" 从请求路由中获取token值进行验证 """ def authenticate (self, request ):"token" , "" )if not token:return None filter (token=token).first()if not user_obj:raise AuthenticationFailed({"code" : 1002 , "error" : "认证失败" })return user_obj, tokendef authenticate_header (self, request ):return 'Bearer realm="API"' class HeardTokenAuth (BaseAuthentication ):""" 从请求头中获取token值进行验证 """ def authenticate (self, request ):"HTTP_TOKEN" , "" )if not token:raise AuthenticationFailed({"code" : 1002 , "error" : "认证失败" })filter (token=token).first()if not user_obj:raise AuthenticationFailed({"code" : 1002 , "error" : "认证失败" })return user_obj, tokendef authenticate_header (self, request ):return 'Bearer realm="API"'
1 2 3 4 5 6 7 8 9 10 11 12 13 14 15 16 17 from rest_framework.views import APIViewfrom rest_framework.response import Responsefrom app01.auth import UserTokenAuth, HeardTokenAuthclass ProductManage (APIView ):def get (self, request, *args, **kwargs ):"id" : 1 , "title" : "mate30" , "price" : 3000 },"id" : 2 , "title" : "mate40" , "price" : 4000 },"id" : 3 , "title" : "mate50" , "price" : 5000 },return Response(product_list)
2. 关于认证的返回值 认证类中的 authenticate 方法返回值主要有以下几种情形:
返回元组,即直接返回两个值,例如:return user_obj, token 或者直接 return None, None,此时会把两个值分别赋值给 request.user 和 request.auth,后续的认证类也不会执行了;
抛出异常,例如:raise AuthenticationFailed({"code": 1002, "error": "认证失败"}),此时后续的认证类也不会执行了。
返回 None,例如:return None,此时会继续执行后续的认证类,如果所有的认证类的 authenticate 都返回了None,则默认 request.user="AnonymousUser"(匿名用户) 和 request.auth=None 。当然,这两个默认值也可以通过配置来重新定义
1 2 3 4 5 6 7 "UNAUTHENTICATED_USER" : lambda : None ,"UNAUTHENTICATED_TOKEN" : lambda : None ,
3. 关于返回 None 的用法
1 2 3 4 5 6 7 8 9 10 11 12 13 14 15 16 17 18 19 20 21 22 23 24 25 26 27 28 29 30 31 32 33 34 35 36 37 38 39 40 41 42 43 44 45 46 47 48 49 50 51 52 53 54 from rest_framework.authentication import BaseAuthenticationfrom rest_framework.exceptions import AuthenticationFailedfrom app01.models import UserInfofrom rest_framework.authentication import BaseAuthenticationfrom rest_framework.exceptions import AuthenticationFailedfrom app01.models import UserInfoclass UserTokenAuth (BaseAuthentication ):""" 从请求路由中获取token值进行验证 """ def authenticate (self, request ):"token" , "" )if not token:return None filter (token=token).first()if not user_obj:raise AuthenticationFailed({"code" : 1002 , "error" : "认证失败" })return user_obj, tokendef authenticate_header (self, request ):return 'Bearer realm="API"' class HeardTokenAuth (BaseAuthentication ):""" 从请求头中获取token值进行验证 """ def authenticate (self, request ):"HTTP_TOKEN" , "" )if not token:return None filter (token=token).first()if not user_obj:raise AuthenticationFailed({"code" : 1002 , "error" : "认证失败" })return user_obj, tokendef authenticate_header (self, request ):return 'Bearer realm="API"'
1 2 3 4 5 6 7 8 9 10 11 12 13 14 15 16 17 18 19 20 21 22 class ProductManage (APIView ):def get (self, request, *args, **kwargs ):if not request.user:"id" : 1 , "title" : "xxx" , "price" : 9999 },"id" : 2 , "title" : "xxx" , "price" : 9999 },"id" : 3 , "title" : "xxx" , "price" : 9999 },else :"id" : 1 , "title" : "mate30" , "price" : 3000 },"id" : 2 , "title" : "mate40" , "price" : 4000 },"id" : 3 , "title" : "mate50" , "price" : 5000 },return Response(product_list)
三、认证组件源码分析 认证组件功能的实现可以通过源码简单剖析一下
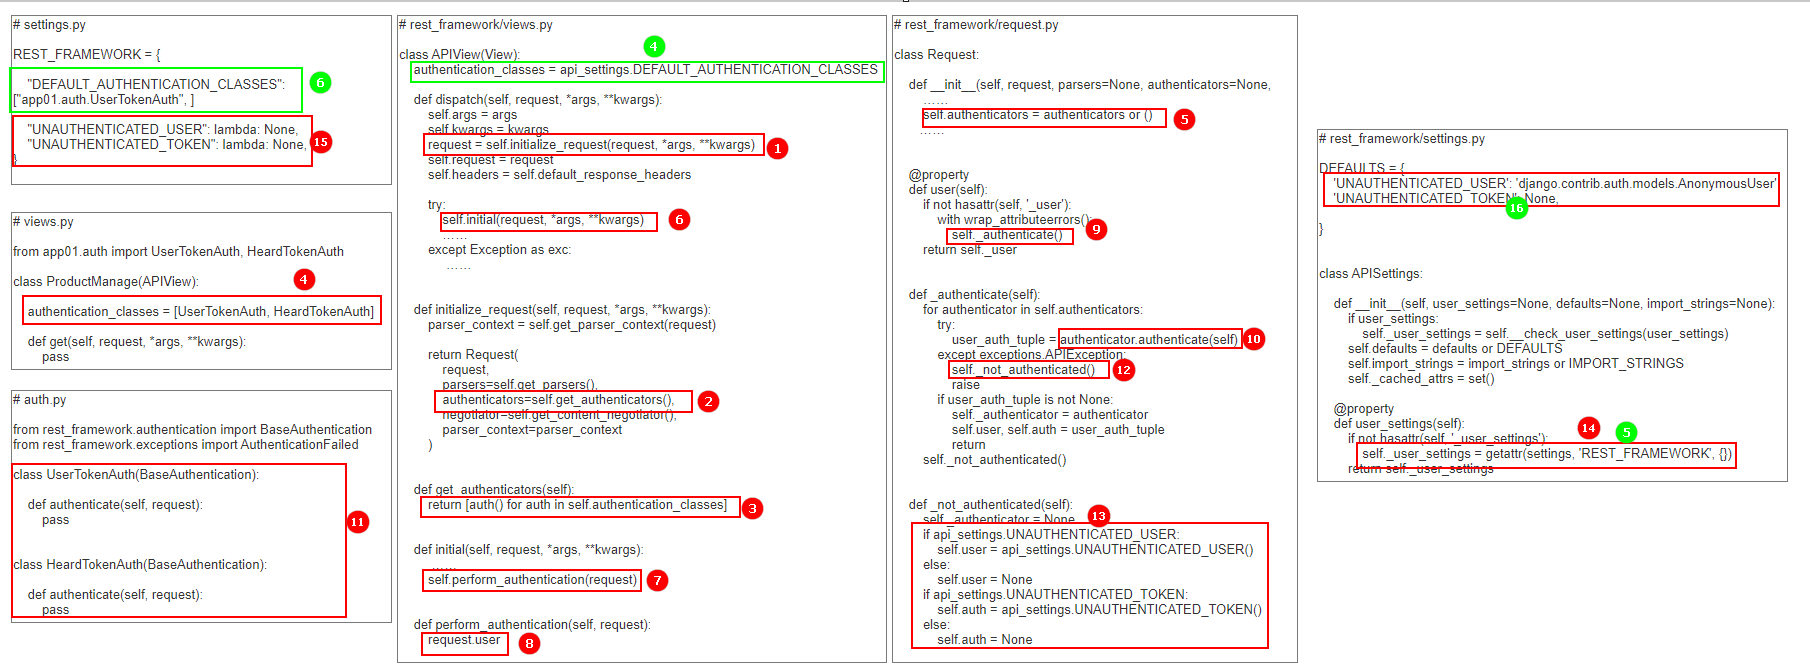
第一步,还是通过视图类先走到 APIView 中的 dispatch 方法,里面有两个地方涉及到认证功能,首先是对请求数据的封装,即 request = self.initialize_request(request, *args, **kwargs);
第二步,self.initialize_request 中实例化rest_framework.request.Request 类时,将 self.get_authenticators() 方法的返回值赋值给了参数 authenticators,self.get_authenticators() 方法中主要实现了对视图类中 authentication_classes 变量内所有的认证类都进行了实例化,并将所有的实例化对象放在了一个列表,即经过上述步骤会得到:authenticators=[UserTokenAuth(), HeardTokenAuth()];
第三步,回到 dispatch 方法中,继续执行 self.initial(request, *args, **kwargs) 方法,该方法内部又调用了 self.perform_authentication(request) 方法,perform_authentication 内部又调用了 request.user,而 request.user 是 rest_framework.request.Request 类的一个属性;
第四步,在 rest_framework.request.Request 的属性方法 user 中调用了 self._authenticate() 方法,该方法也是实现认证过程的核心部分;
第五步,self._authenticate() 对 self.authenticators 中所有对象进行循环,即对我们自己编写的所有认证类的实例化对象进行循环操作,调用每个对象的 authenticate 方法:
如果方法执行报错,调用 self._not_authenticated(),抛出异常,后续认证过程停止,认证过程结束;
如果方法正常执行完,会返回一个结果,如果结果不是 None,则结果为一个元组,将两个值分别赋值给 self.user 和 self.auth,后续认证过程停止,认证过程结束;如果结果是 None,则继续循环;
如果所有对象都循环完了,证明所有对象 authenticate 方法返回的都是 None ,则调用 self._not_authenticated() 方法,,认证过程结束;
第六步,在 self._not_authenticated() 中主要是针对认证类异常和全部跳过情况下,对 self.user 和 self.auth 两个变量取值做了一些处理。首先会先优先从工程下的 settings.py 中查找开发者是否做了相关配置,如果没有配置,则采用 rest_framework/settings.py 内的默认配置。
补充 :当我们自己编写的视图类中没有定义 authentication_classes,则会去父类,即 APIView 中寻找,最终会找到我们在配置文件中定义的 DEFAULT_AUTHENTICATION_CLASSES,从而使得认证组件的功能可以作用于全局。