一、AJAX简介 我们知道,前端页面想要和后端接口进行数据交互,可以通过以下方式:
将参数添加到 url 中,后端通过 get 方式从 url 中获取数据;
前端页面通过 form 表单,将数据以 get 或者 post 的方式发送给后端;
前端通过 a 标签(和使用url方式传参的方式类似);
此外,我们还可以使用 ajax 技术来实现前后端数据的交互。
AJAX(Asynchronous Javascript And XML)翻译成中文就是“异步的Javascript和XML”。即使用Javascript语言与服务器进行异步交互,传输的数据为XML(当然,传输的数据不只是XML)。AJAX 不是新的编程语言,而是一种使用现有标准的新方法。
AJAX 最大的优点是在不重新加载整个页面的情况下,可以与服务器交换数据并更新部分网页内容。(这一特点给用户的感受是在不知不觉中完成请求和响应过程)。AJAX 不需要任何浏览器插件,但需要用户允许JavaScript在浏览器上执行。
同步交互:客户端发出一个请求后,需要等待服务器响应结束后,才能发出第二个请求;
异步交互:客户端发出一个请求后,无需等待服务器响应结束,就可以发出第二个请求。
AJAX用于局部刷新页面 和异步请求 的特点,因此和使用Form表单和后端进行数据交互的方式比较,具有以下优点:
AJAX使用JavaScript技术向服务器发送异步请求;
AJAX请求无须刷新整个页面;
因为服务器响应内容不再是整个页面,而是页面中的部分内容,所以AJAX性能高;
二、AJAX的简单使用 2.1 简单实现 AJAX技术是基于JS的,因此使用AJAX发送的请求也属于 JS 请求,而通过 Form表单等形式来发送请求的方式属于 HTML请求。在编写AJAX请求之前,我们先来回顾一下使用 Form 表单来和后端交互
1
2
3
4
5
6
7
8
9
10
11
12
13
14
<!DOCTYPE html > <html lang ="en" > <head > <meta charset ="UTF-8" > <title > Title</title > </head > <body > <form action ="/test_form/" method ="post" > <input type ="text" name ="user" > <input type ="password" name ="pwd" > <input type ="submit" value ="登录" > </form > </body > </html >
我们再来观察一下AJAX的方式
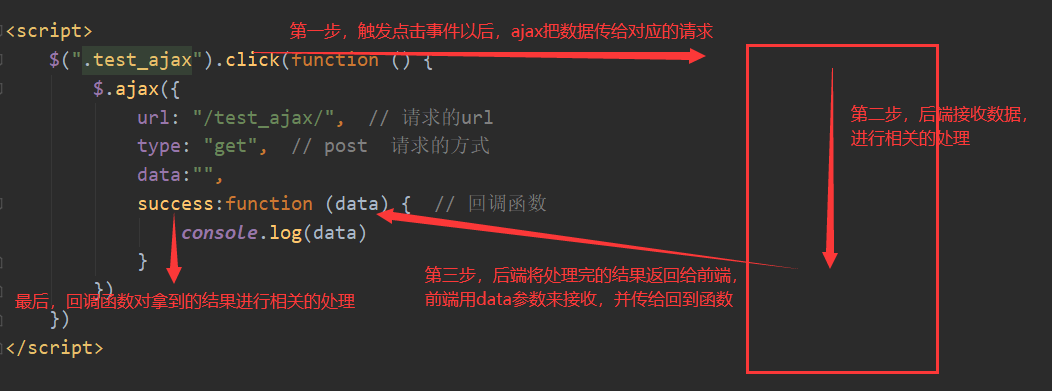
1
2
3
4
5
6
7
8
9
10
11
12
13
14
15
16
17
18
19
20
21
22
23
24
<!DOCTYPE html > <html lang ="en" > <head > <meta charset ="UTF-8" > <title > Title</title > <script src ="https://cdn.bootcss.com/jquery/3.4.1/jquery.min.js" > </script > </head > <body > <button class ="test_ajax" > ajax提交</button > </body > <script > $(".test_ajax" ).click (function ( $.ajax ({ url : "/test_ajax/" , type : "get" , data :"" , success :function (data ) { console .log (data) } }) }) </script > </html >
对比两种方式,我们可以发现有以下区别:
从实现方式上来看,form表单会自动将input标签中用户输入的值组装成键值对,在点击提交后自动发送给后端,这也就是为什么input标签必须有name属性的原因了,name属性的值,即为键值对的键。而对于ajax方式来说,实际上就是给提交按钮绑定了一个点击事件,数据也需要手动传给后端,所以对于ajax而言,只要能定位到要取值的标签就可以了,取值和数据封装工作由程序员来完成。
从实现效果上来看,通过form表单发送数据,点击提交后是对整个页面的刷新,即之前在数据框中填入的数据会置空,而使用ajax方式,点击提交后只是局部刷新,并不会将整个页面重新覆盖。(点击提交后仔细观察浏览器地址栏,form会进行刷新,ajax不会)
所以在实际的项目中,往往都是使用ajax来和后端进行数据交互的。
2.2 参数介绍
url 请求发送的url,相当于form表单中的actiontype 请求的方式,相当于form表单中的methoddata 要发送的数据,数据类型是 object 类型(类似python中的字典类型)success 回调函数,data为后端返回的结果
2.3 ajax交互的流程 2.4 使用JS实现AJAX 由于使用js实现ajax的过程比较麻烦,通常我们直接使用jQuery来实现
1
2
3
4
5
6
7
8
9
10
11
12
13
var b2 = document .getElementById ("b2" );onclick = function (var xmlHttp = new XMLHttpRequest ();open ("POST" , "/ajax_test/" , true );setRequestHeader ("Content-type" , "application/x-www-form-urlencoded" );send ("username=cdc&password=123456" );onreadystatechange = function (if (xmlHttp.readyState === 4 && xmlHttp.status === 200 ) {alert (xmlHttp.responseText );
三、AJAX传递数据 使用Ajax实现一个简单的计算器
1 2 3 4 5 6 7 8 from django.conf.urls import urlfrom app01 import viewsr'^index/$' , views.index),r'^count/$' , views.count),
1 2 3 4 5 6 7 8 9 10 11 12 13 14 15 16 17 18 19 20 21 22 23 24 25 26 27 28 29 30 31 32 <!DOCTYPE html > <html lang ="en" > <head > <meta charset ="UTF-8" > <title > Title</title > <script src ="https://cdn.bootcss.com/jquery/3.4.1/jquery.min.js" > </script > </head > <body > <input type ="text" class ="add_no1" > +<input type ="text" class ="add_no2" > =<input type ="text" class ="add_ret" > <button class ="ajax_test" > 提交</button > </body > <script > $(".ajax_test" ).click (function ( $.ajax ({ url : "/count/" , type : "post" , data : { "add_1" : $(".add_no1" ).val (), "add_2" : $(".add_no2" ).val (), }, success : function (data ) { $(".add_ret" ).val (data) } }) }) </script > </html >
1 2 3 4 5 6 7 8 9 10 11 12 13 14 15 16 17 from django.shortcuts import render, HttpResponseimport jsondef index (request ):return render(request, "index.html" )def count (request ):print (request.POST)int (request.POST.get("add_1" ))int (request.POST.get("add_2" ))return HttpResponse(ret)
四、AJAX实现登录验证 用户在页面输入用户名和密码,如果正确返回成功页面,错误则在登录页面提示用户名或者密码错误
1 2 3 4 5 6 7 8 9 from django.conf.urls import urlfrom app01 import viewsr'^login/$' , views.login),r'^login/success/$' , views.login_success),
1 2 3 4 5 6 7 8 9 10 11 12 13 14 15 16 17 18 19 20 21 22 23 24 25 26 27 28 29 30 31 32 33 34 35 36 37 38 39 40 41 42 43 44 45 46 <!DOCTYPE html > <html lang ="en" > <head > <meta charset ="UTF-8" > <title > Title</title > <script src ="https://cdn.bootcss.com/jquery/3.4.1/jquery.min.js" > </script > </head > <body > <div > <input type ="text" id ="user_name" > </div > <div > <input type ="text" id ="pwd" > </div > <div > <button id ="login" > 登录</button > </div > <span class ="content" > </span > </body > <script > $("#login" ).click (function ( $.ajax ({ url : "/login/" , type : "post" , data : { "user_name" : $("#user_name" ).val (), "pwd" : $("#pwd" ).val () }, success : function (data ) { console .log (data); var res = JSON .parse (data); if (res.user ) { location.href = "/login/success/" } else { $(".content" ).html (res.msg ) } } }) }) </script > </html >
1 2 3 4 5 6 7 8 9 10 11 12 13 14 15 16 17 18 19 20 21 22 23 24 25 from django.shortcuts import render, HttpResponsefrom app01.models import Userimport jsondef login (request ):if request.method == "POST" :"user" : None , "msg" : None }"user_name" )"pwd" )filter (user_name=name, pwd=pwd).first()if user:"user" ] = user.user_nameelse :"msg" ] = "username or password error" return HttpResponse(json.dumps(ret))return render(request, "login.html" )def login_success (request ):return render(request, "success.html" )
1 2 3 4 5 6 7 8 from django.db import modelsclass User (models.Model):32 )32 )
五、使用AJAX上传文件 在之前,我们简单介绍过使用 form 表单上传文件的方法
1 2 3 4 5 6 7 8 9 from django.conf.urls import urlfrom app01 import viewsr'^upload/$' , views.upload),r'^upload/file/$' , views.upload_file),
1 2 3 4 5 6 7 8 9 10 11 12 13 14 15 16 <!DOCTYPE html > <html lang ="en" > <head > <meta charset ="UTF-8" > <title > 文件上传示例</title > </head > <body > <form action ="/upload/file/" method ="post" enctype ="multipart/form-data" > <p > 用户名:<input type ="text" name ="name" > </p > <p > 头像:<input type ="file" name ="avatar" > </p > <p > <input type ="submit" value ="提交" > </p > </form > </body > </html >
1 2 3 4 5 6 7 8 9 10 11 12 13 14 15 16 from django.shortcuts import render, HttpResponsedef upload (request ):return render(request, "upload.html" )def upload_file (request ):""" 接收文件逻辑 :param request: :return: """ return HttpResponse("ok" )
除了form表单发送数据的三要素外,还需要对form表的属性 enctype 进行值得设定,其实针对 enctype 属性,我们有必要要详细的引申一下。
5.2 Content-Type介绍 我们知道,所有的网络请求都是要遵循 http 协议的,例如在前后端进行数据交互中,我们就要告知后端服务器,前端的数据是按照什么样的格式来封装的,那么后端就会根据该格式进行反解,这些数据的封装格式,都可以在 http 请求头中的 Content-Type 字段中看到,而form表单中的属性 enctype,就是用于固定数据传输封装的格式的。
当传输非文件数据时,不用写 enctype 或者 enctype = “application/x-www-form-urlencoded”
1
2
3
4
5
6
7
8
9
10
11
12
13
14
<!DOCTYPE html > <html lang ="en" > <head > <meta charset ="UTF-8" > <title > 文件上传示例</title > </head > <body > <form action ="/upload/file/" method ="post" > <p > 用户名:<input type ="text" name ="name" > </p > <p > 密码:<input type ="text" name ="pwd" > </p > <p > <input type ="submit" value ="提交" > </p > </form > </body > </html >
如果不规定 enctype 的值,enctype 就会使用”application/x-www-form-urlencoded”作为默认值,此时我们从web页面查看请求头可以发现Content-Type的值为application/x-www-form-urlencoded
1 2 3 4 5 6 7 8 9 10 11 12 13 14 15 16 17 18 19 20 21 22 23 24 POST /upload/file/ HTTP/1 .1 Host : 127.0.0.1:8000 Connection : keep-aliveContent -Length: 83 Cache -Control: max-age=0 Origin : http://127.0.0.1:8000 Upgrade -Insecure-Requests: 1 Content -Type: application/x-www-form-urlencodedUser -Agent: Mozilla/5 .0 (Windows NT 10 .0 ; Win64; x64) AppleWebKit/537 .36 (KHTML, like Gecko) Chrome/80 .0 .3987 .122 Safari/537 .36 Sec -Fetch-Dest: documentAccept : text/html,application/xhtml+xml,application/xml;q=0 .9 ,image/webp,image/apng,*/*;q=0 .8 ,application/signed-exchange;v=b3;q=0 .9 Sec -Fetch-Site: same-originSec -Fetch-Mode: navigateSec -Fetch-User: ?1 Referer : http://127.0.0.1:8000 /upload/Accept -Encoding: gzip, deflate, brAccept -Language: zh-CN,zh;q=0 .9 Cookie : csrftoken=1 rBhf4zliEruWHaoPmvQurF4RirU36j0D5snKSSkIdnbcZUiWEQysFvBSJJuBzGtname =cdc&pwd=123456
此时,发送的数据就会按照urlencoded的格式封装在请求体中,当django服务器检测到数据传输的格式是urlencoded时,就会对请求他中的数据进一步处理,把数据处理成QueryDict的形式,并封装到request.POST中
1 2 3 4 5 6 7 8 9 10 11 def upload_file (request ):""" 接收文件逻辑 :param request: :return: """ print ("body中的内容" , request.body)print ("psot中的内容" ,request.POST)return HttpResponse("ok" )
1
2
3
# 输出结果 123456 ': {'name': ['cdc'], 'pwd': ['123456 ']}>
所以,当数据的传输方式为urlencoded时,发送的数据是以 b’name=cdc&pwd=123456’ 的形式封装在请求体中的,django机制会对数据进一步处理。但是如果使用该方式传输文件时:
1
2
3
4
5
6
7
8
9
10
11
12
13
14
<!DOCTYPE html > <html lang ="en" > <head > <meta charset ="UTF-8" > <title > 文件上传示例</title > </head > <body > <form action ="/upload/file/" method ="post" enctype ="application/x-www-form-urlencoded" > <p > 用户名:<input type ="text" name ="name" > </p > <p > 头像:<input type ="file" name ="avatar" > </p > <p > <input type ="submit" value ="提交" > </p > </form > </body > </html >
1
2
3
4
5
6
7
8
9
10
11
def upload_file (request ):""" 接收文件逻辑 :param request: :return: """ print ("body中的内容" , request.body)print ("psot中的内容" , request.POST)print (request.POST.get("name" ))print (request.FILES.get("avatar" ))return HttpResponse("ok" )
1 2 3 4 5 'name=cdc&avatar=my_avatar.jpg' 'name' : ['cdc' ], 'avatar' : ['my_avatar.jpg' ]}>None
只能接收到文件名,但是无法接收文件的实际内容,因此涉及到文件传输时,该数据传输方式无法满足
当传输文件时,enctype = “multipart/form-data”
1
2
3
4
5
6
7
8
9
10
11
12
13
14
<!DOCTYPE html > <html lang ="en" > <head > <meta charset ="UTF-8" > <title > 文件上传示例</title > </head > <body > <form action ="/upload/file/" method ="post" enctype ="multipart/form-data" > <p > 用户名:<input type ="text" name ="name" > </p > <p > 头像:<input type ="file" name ="avatar" > </p > <p > <input type ="submit" value ="提交" > </p > </form > </body > </html >
1 2 3 4 5 6 7 8 9 10 11 12 13 def upload_file (request ):""" 接收文件逻辑 :param request: :return: """ print ("body中的内容" , request.body)print ("psot中的内容" , request.POST)print (request.POST.get("name" ))print (request.FILES.get("avatar" ))return HttpResponse("ok" )
1
2
3
4
5
6
7
8
9
# 结果b'------WebKitFormBoundaryWvWLmKBZEWP4XMzK\r \n Content-Disposition: form-data; name="name"\r \n \r \n cdc\r \n ------WebKitFormBoundaryWvWLmKBZEWP4XMzK\r \n Content-Disposition: form-data; name="avatar"; filename="\x e9\x 99\x 88\x e8...... psot中的内容 <QueryDict: {' name': [' cdc']}> cdc my_avatar.jpg
我们再从前端观察以下请求相关的信息
1 2 3 4 5 6 7 8 9 10 11 12 13 14 15 16 17 18 19 20 POST /upload/file/ HTTP/1 .1 Host : 127.0.0.1:8000 Connection : keep-aliveContent -Length: 108825 Cache -Control: max-age=0 Origin : http://127.0.0.1:8000 Upgrade -Insecure-Requests: 1 Content -Type: multipart/form-data; boundary=----WebKitFormBoundary7Nna5hqVK9fCxR1mUser -Agent: Mozilla/5 .0 (Windows NT 10 .0 ; Win64; x64) AppleWebKit/537 .36 (KHTML, like Gecko) Chrome/80 .0 .3987 .122 Safari/537 .36 Sec -Fetch-Dest: documentAccept : text/html,application/xhtml+xml,application/xml;q=0 .9 ,image/webp,image/apng,*/*;q=0 .8 ,application/signed-exchange;v=b3;q=0 .9 Sec -Fetch-Site: same-originSec -Fetch-Mode: navigateSec -Fetch-User: ?1 Referer : http://127.0.0.1:8000 /upload/Accept -Encoding: gzip, deflate, brAccept -Language: zh-CN,zh;q=0 .9 Cookie : csrftoken=1 rBhf4zliEruWHaoPmvQurF4RirU36j0D5snKSSkIdnbcZUiWEQysFvBSJJuBzGt
此时 Content-Type的值也变为了 multipart/form-data,当然Content-Type除了这两种数据传输的格式,还有其他的方式,下面我们还会学习如何使用ajax发送json格式的数据。
总结:
不过以何种方式传输数据,只要是POST请求,数据都会以对于的方式封装在请求体中,换句话说,在后台通过request.body都是可以获取到数据的,我们可以自己取出数据并处理。
只有当contentType为urlencoded方式时,request.POST中才有数据,这是django机制帮我们做了进一步的处理。
后台接收文件对象时,必须使用 FILES.get() 方法
5.3 使用AJAX发送json格式的数据 1 2 3 4 5 6 7 8 9 10 11 12 13 14 15 16 17 18 19 20 21 22 23 24 25 26 27 28 29 30 <!DOCTYPE html > <html lang ="en" > <head > <meta charset ="UTF-8" > <title > 文件上传示例</title > <script src ="https://cdn.bootcss.com/jquery/3.4.1/jquery.min.js" > </script > </head > <body > <button class ="btn" > 提交</button > </body > <script > $(".btn" ).click (function ( $.ajax ({ url : "/test/ajax/json/" , type : "post" , contentType : "application/json" , data : JSON .stringify ( { "a" : 1 , "b" : 2 } ), success :function (data ) { console .log (data) } }) }) </script > </html >
1 2 3 4 5 6 7 from django.shortcuts import render, HttpResponsedef ajax_json (request ):print ("body中的内容" , request.body)print ("psot中的内容" , request.POST)return HttpResponse("Ok" )
1 2 3 4 body 中的内容 b'{"a" :1 ,"b" :2 }'psot 中的内容 <QueryDict: {}>
我们再来看一下前端的请求相关的信息
1 2 3 4 5 6 7 8 9 10 11 12 13 14 15 16 17 18 19 20 21 22 23 24 Host: 127.0.0.1:8000 Connection: keep-alive Content-Length: 13 Accept: */* Sec-Fetch-Dest: empty X-Requested-With: XMLHttpRequest User-Agent: Mozilla/5.0 (Windows NT 10.0; Win64; x64) AppleWebKit/537.36 (KHTML, like Gecko) Chrome/80.0.3987.122 Safari/537.36 Content-Type: application/json Origin: http://127.0.0.1:8000 Sec-Fetch-Site: same-origin Sec-Fetch-Mode: cors Referer: http://127.0.0.1:8000/upload/ Accept-Encoding: gzip, deflate, br Accept-Language: zh-CN,zh;q=0.9 Cookie: csrftoken=1rBhf4zliEruWHaoPmvQurF4RirU36j0D5snKSSkIdnbcZUiWEQysFvBSJJuBzGt {"a":1,"b":2}
通过测试我们可以知道,json格式的传输方式是将数据按照键值对的排列方式进行封装的,由于不是urlencoded方式,所以request.POST无法拿到数据,但是数据还是会被封装在请求体中。
5.4 Ajax上传文件 1 2 3 4 5 6 7 8 from django.conf.urls import urlfrom app01 import viewsr'^upload/$' , views.upload),r'^upload/file/$' , views.upload_file),
1 2 3 4 5 6 7 8 9 10 11 12 13 14 15 16 17 18 19 20 21 22 23 24 25 26 27 28 29 30 31 32 33 34 35 36 37 38 <!DOCTYPE html > <html lang ="en" > <head > <meta charset ="UTF-8" > <title > 文件上传示例</title > <script src ="https://cdn.bootcss.com/jquery/3.4.1/jquery.min.js" > </script > </head > <body > <p > 用户名:<input type ="text" class ="name" > </p > <p > 头像:<input type ="file" class ="avatar" > </p > <p > <input type ="button" value ="提交" class ="btn" > </p > </body > <script > $(".btn" ).click (function ( var formdata = new FormData (); formdata.append ("name" , $(".name" ).val ()); formdata.append ("avatar" , $(".avatar" )[0 ].files [0 ]); $.ajax ({ url : "/upload/file/" , type : "post" , contentType : false , processData : false , data :formdata, success :function (data ) { console .log (data) } }) }) </script > </html >
1 2 3 4 5 6 7 8 9 10 11 12 13 14 15 16 17 18 19 20 21 22 23 24 import osfrom django.shortcuts import render, HttpResponsefrom Django_AJAX.settings import BASE_DIRdef upload_file (request ):""" 接收文件逻辑 :param request: :return: """ print ("body中的内容" , request.body)print ("psot中的内容" , request.POST)"name" )"avatar" )f"{name} _avatar.jpg" )with open (file_name, "wb" ) as fw:for chunk in file_obj.chunks():return HttpResponse("ok" )
六、AJAX设置csrf_token 6.1 方式一
通过获取隐藏的input标签中的csrfmiddlewaretoken值,放置在data中发送。
1 2 3 4 5 6 7 8 9 10 11 12 13 14 15 16 17 18 19 20 21 22 23 24 25 26 27 28 29 <!DOCTYPE html > <html lang ="en" > <head > <meta charset ="UTF-8" > <title > Title</title > <script src ="https://cdn.bootcss.com/jquery/3.4.1/jquery.min.js" > </script > </head > <body > <button class ="btn" > 提交</button > </body > <script > $(".btn" ).click (function ( $.ajax ({ url : "/test/ajax/csrf/" , type : "post" , data : { "a" : 1 , "b" : 2 , "csrfmiddlewaretoken" : $("[name='csrfmiddlewaretoken']" ).val () }, success :function (data ) { console .log (data) } }) }) </script > </html >
6.2 方式二
通过获取返回的cookie中的字符串 放置在请求头中发送。此时需要引入一个 jquery.cookie.js 插件。
1 2 3 4 5 6 7 8 9 10 11 12 13 14 15 16 17 18 19 20 21 22 23 24 25 26 27 28 29 30 <!DOCTYPE html > <html lang ="en" > <head > <meta charset ="UTF-8" > <title > Title</title > <script src ="https://cdn.bootcss.com/jquery/3.4.1/jquery.min.js" > </script > <script src ="/static/js/jquery.cookie.js" > </script > </head > <body > <button class ="btn" > 提交</button > </body > <script > $(".btn" ).click (function ( $.ajax ({ url : "/test/ajax/csrf/" , type : "post" , headers : {"X-CSRFToken" : $.cookie ("csrftoken" )}, data : { "a" : 1 , "b" : 2 , }, success : function (data ) { console .log (data) } }) }) </script > </html >
6.3 方式三 1 2 3 4 5 6 7 8 9 10 11 12 13 14 15 16 function getCookie (name ) {var cookieValue = null ;if (document .cookie && document .cookie !== '' ) {var cookies = document .cookie .split (';' );for (var i = 0 ; i < cookies.length ; i++) {var cookie = jQuery.trim (cookies[i]);if (cookie.substring (0 , name.length + 1 ) === (name + '=' )) {decodeURIComponent (cookie.substring (name.length + 1 ));break ;return cookieValue;var csrftoken = getCookie ('csrftoken' );
每一次都这么写太麻烦了,可以使用$.ajaxSetup()方法为ajax请求统一设置。
1 2 3 4 5 6 7 8 9 10 11 12 function csrfSafeMethod (method ) {return (/^(GET|HEAD|OPTIONS|TRACE)$/ .test (method));ajaxSetup ({beforeSend : function (xhr, settings ) {if (!csrfSafeMethod (settings.type ) && !this .crossDomain ) {setRequestHeader ("X-CSRFToken" , csrftoken);
注意 :
如果使用从cookie中取csrftoken的方式,需要确保cookie存在csrftoken值。如果你的视图渲染的HTML文件中没有包含 {% csrf_token %},Django可能不会设置CSRFtoken的cookie。这个时候需要使用ensure_csrf_cookie()装饰器强制设置Cookie。
1 2 3 4 5 6 7 8 9 10 from django.views.decorators.csrf import ensure_csrf_cookie@ensure_csrf_cookie def ajax_csrf (request ):if request.method == "POST" :return HttpResponse("OK" )return render(request, "ajax_csrf.html" )