一、视图层简介 一个视图函数(类),简称视图,是一个简单的 Python 函数(类),它接受 Web 请求并且返回 Web 响应。响应可以是一张网页的 HTML 内容,一个重定向,一个404错误,一个XML文档,或者一张图片。
无论视图本身包含什么逻辑,都要返回响应。代码写在哪里也无所谓,只要它在你当前项目目录下面。除此之外没有更多的要求了。为了将代码放在某处,大家约定成俗将视图放置在项目(project)或应用程序(app)目录中的名为 views.py 的文件中。
1 2 3 4 5 6 7 8 9 10 from django.conf.urls import urlfrom django.contrib import adminfrom Django视图层 import viewsr'^admin/' , admin.site.urls),r'^index/' , views.index),
1 2 3 4 5 6 7 from django.shortcuts import HttpResponsedef index (request ): print ("进行对应的逻辑处理..." )return HttpResponse("这是首页" )
二、FBV和CBV 2.1 FBV FBV 是基于函数的视图(function base view),即视图层的相关逻辑处理接口都是基于函数的。下面我们根据一个用户登录的示例来看一下FBV的用法
1 2 3 4 5 6 7 8 from django.conf.urls import urlfrom Django视图层 import viewsr"^login/" , views.login)
1 2 3 4 5 6 7 8 9 10 11 12 13 14 15 16 17 from django.shortcuts import HttpResponse, renderdef login (request ):if request.method == "POST" :"name" )"pwd" )if username == "cdc" and password == "123456" :return render(request, "index.html" )else :return HttpResponse("用户名或者密码错误" )return render(request, "login.html" )
1 2 3 4 5 6 7 8 9 10 11 12 13 14 15 16 17 18 19 20 21 22 23 24 25 26 27 28 29 30 31 32 33 34 35 36 37 38 <!DOCTYPE html > <html lang ="en" > <head > <meta charset ="UTF-8" > <title > 登录页面</title > </head > <body > <form action ="/login/" method ="post" > <div > <label for ="name" > <input type ="text" name ="name" id ="name" placeholder ="请输入用户名" > </label > </div > <div > <label for ="pwd" > <input type ="password" name ="pwd" id ="pwd" placeholder ="请输入密码" > </label > </div > <div > <input type ="submit" value ="登录" > </div > </form > </body > </html > <!DOCTYPE html > <html lang ="en" > <head > <meta charset ="UTF-8" > <title > 首页</title > </head > <body > <h1 style ="text-align: center;color: red" > 欢迎登录</h1 > </body > </html >
2.2 CBV CBV是基于类的视图(class base view),采用CBV可以引入面向对象的思想对数据进行更高程度的封装。使用CBV来编写视图层如下:
1 2 3 4 5 6 7 8 9 10 11 12 13 14 15 16 17 18 19 20 21 from django.shortcuts import HttpResponse, renderfrom django.views import Viewclass Login (View ):def get (self, request ):print ("接收到get请求了" )return render(request, "login.html" )def post (self, request ):print ("接收到post请求了" )"name" )"pwd" )if username == "cdc" and password == "123456" :return render(request, "index.html" )else :return HttpResponse("用户名或者密码错误" )
1 2 3 4 5 6 7 8 from django.conf.urls import urlfrom Django视图层 import viewsr"^login/" , views.Login.as_view()),
在使用CBV方式构建视图层时,要求必须自己先定义一个类,在路由层调用该类的实例化对象时,也要使用django自己的实例化方式,即 “类名.as_view()”。
2.3 CBV源码剖析 我们根据CBV的源码来详细了解一下django内部究竟是怎么实现这个机制的。
第一步:
浏览器发送请求后,先来到了路由层,路由层根据请求的路由调用了对应的视图,即 Login 类中的 as_view() 方法,显然我们自己定义的Login类中是没有这个方法的,所以该方法肯定是使用的父类 View 中的。
1 2 3 4 5 6 7 8 9 10 11 12 13 14 15 16 17 18 19 20 21 22 23 24 25 26 27 28 29 30 31 32 33 34 35 36 37 38 39 40 41 42 43 44 45 46 47 48 49 50 51 52 53 54 55 56 57 58 59 60 61 62 63 64 65 66 67 68 69 70 71 72 73 74 75 76 77 78 79 80 81 82 class View (object ):""" Intentionally simple parent class for all views. Only implements dispatch-by-method and simple sanity checking. """ 'get' , 'post' , 'put' , 'patch' , 'delete' , 'head' , 'options' , 'trace' ]def __init__ (self, **kwargs ):""" Constructor. Called in the URLconf; can contain helpful extra keyword arguments, and other things. """ for key, value in six.iteritems(kwargs):setattr (self , key, value) @classonlymethod def as_view (cls, **initkwargs ):""" Main entry point for a request-response process. """ for key in initkwargs:if key in cls.http_method_names:raise TypeError("You tried to pass in the %s method name as a " "keyword argument to %s(). Don't do that." if not hasattr (cls, key):raise TypeError("%s() received an invalid keyword %r. as_view " "only accepts arguments that are already " "attributes of the class." % (cls.__name__, key))def view (request, *args, **kwargs ):self = cls(**initkwargs)if hasattr (self , 'get' ) and not hasattr (self , 'head' ):self .head = self .getself .request = requestself .args = argsself .kwargs = kwargsreturn self .dispatch(request, *args, **kwargs)return viewdef dispatch (self, request, *args, **kwargs ):if request.method.lower() in self .http_method_names:getattr (self , request.method.lower(), self .http_method_not_allowed)else :self .http_method_not_allowedreturn handler(request, *args, **kwargs)def http_method_not_allowed (self, request, *args, **kwargs ):'Method Not Allowed (%s): %s' , request.method, request.path,'status_code' : 405 , 'request' : request}return http.HttpResponseNotAllowed(self ._allowed_methods())def options (self, request, *args, **kwargs ):""" Handles responding to requests for the OPTIONS HTTP verb. """ 'Allow' ] = ', ' .join(self ._allowed_methods())'Content-Length' ] = '0' return responsedef _allowed_methods (self ):return [m.upper() for m in self .http_method_names if hasattr (self , m)]
第二步:
我们能在父类中找到 as_view() 方法,发现该方法最后返回的是一个 view() 函数,我们再详细看一下 view 中做了什么事情。 view 函数中先实例化了一个当前自己定义的类的对象 self = cls(**initkwargs),再将所有接收到的参数以及请求相关的内容request都传给了 dispatch() 函数。
第三步:
我们继续来到 dispatch() 函数中,首先将请求方式(post、get等)小写话处理,再去 http_method_names 中匹配是否有该种请求方式,如果有,就根据映射去执行对应的函数,如果没有就返回错误信息,这就是为什么我们在类中编写了get和post同名的函数后,不同的请求会执行不同的函数的原因了,当然我们也可以在类中定义自己的 dispatch() 方法,根据自己的需求做出相关的处理。
第四步:
dispatch() 函数处理完第三步的逻辑后,最终会返回一个 handler,handler 是 http_method_not_allowed() 函数的一个返回值,是一个 HttpResponse 格式的值。
所以,根据上述源码的分析,我们简单总结以下CBV的执行流程:
收到请求以后,根据urls.py去找对应的视图,即 类名.as_view()
来到视图层,找到对应的类,如果没有找到 as_view() 方法,就去执行继承的父类的 as_view() 方法,进一步执行 as_view() 中的 view()
执行view函数
实例化自己写的类 self = cls(**initkwargs)
将接收到的请求相关的内容传给实例化对象 self.request = request
执行 self.dispatch(request, *args, **kwargs)
执行父类中的 dispatch 方法,判断请求是否被允许,最后返回 handler(request, *args, **kwargs),如果允许:handler = 通过反射获取 get post 等方法 ;如果不允许:handler = 不允许的方法
返回HttpResponse对象
返回HttpResponse对象 给django
我们可以在类中定义自己的 dispatch 方法
1 2 3 4 5 6 7 8 9 10 11 12 13 14 15 16 17 18 19 20 21 22 23 24 25 26 27 from django.shortcuts import HttpResponse, renderfrom django.views import Viewclass Login (View ):def dispatch (self, request, *args, **kwargs ):print ("请求来之前可以做一些处理" )super ().dispatch(request, *args, **kwargs) print ("请求来之后可以做一些处理" )return ret def get (self, request ):print ("接收到get请求了" )return render(request, "login.html" )def post (self, request ):print ("接收到post请求了" )"name" )"pwd" )if username == "cdc" and password == "123456" :return render(request, "index.html" )else :return HttpResponse("用户名或者密码错误" )
1
2
3
4
5
6
7
8
9
# 启动项目进行测试,分别发送一个get请求和post请求xiang[12/Mar/2020 16:13:36] "GET /login/ HTTP/1.1" 200 624 [12/Mar/2020 16:13:55] "POST /login/ HTTP/1.1" 200 187
可以观察到,dispatch 是在最先被执行的,换而言之,来到视图层找到对应的类后,先执行 dispatch 方法,后根据请求执行对应的视图,其实 dispatch 可以充当装饰器的功能。
了解CBV的实际处理机制后,我们还可根据实际的需要做更多的自定制,如我们自定义允许处理的请求方式
1
2
3
4
5
6
7
8
9
10
11
12
13
14
15
16
17
18
19
20
21
22
23
24
25
26
class Login (View ):'get' ]def dispatch (self, request, *args, **kwargs ):print ("请求来之前可以做一些处理" )super ().dispatch(request, *args, **kwargs) print ("请求来之后可以做一些处理" )return ret def get (self, request ):print ("接收到get请求了" )return render(request, "login.html" )def post (self, request ):print ("接收到post请求了" )"name" )"pwd" )if username == "cdc" and password == "123456" :return render(request, "index.html" )else :return HttpResponse("用户名或者密码错误" )
1
2
3
4
5
6
7
8
9
# 启动项目进行测试,分别发送一个get请求和post请求,get可以正常执行,post报错,该请求方式不允许[12/Mar/2020 16:23:23] "GET /login/ HTTP/1.1" 200 624 [12/Mar/2020 16:23:30] "POST /login/ HTTP/1.1" 405 0
2.4 视图层添加装饰器 2.4.1 对于FBV FBV使用装饰器和正常的函数使用装饰器没有任何区别。
1 2 3 4 5 6 7 8 9 10 11 12 13 14 15 16 17 18 19 20 21 22 23 24 25 26 def timer (fn ):def inner (*args, **kwargs ):print (f"执行花费了{time.time() - start} 秒" )return ret return inner@timer def login (request ):if request.method == "POST" :"name" )"pwd" )if username == "cdc" and password == "123456" :return render(request, "index.html" )else :return HttpResponse("用户名或者密码错误" )return render(request, "login.html" )
1 2 3 4 5 6 7 8 from django.conf.urls import urlfrom Django视图层 import viewsr"^login/" , views.login)
2.4.2 对于CBV 给CBV添加装饰器需要用到django自带的方法,有以下三种方式添加装饰器
1 2 3 4 5 6 7 8 9 10 11 12 13 14 15 16 17 18 19 20 21 22 23 24 25 26 27 28 29 30 31 32 33 34 35 36 37 38 39 40 41 42 from django.shortcuts import HttpResponse, renderfrom django.utils.decorators import method_decoratorfrom django.views import Viewimport timedef timer (fn ):def inner (*args, **kwargs ):print (f"执行花费了{time.time() - start} 秒" )return ret return inner@method_decorator(timer, name="get" ) @method_decorator(timer, name="post" ) class Login (View ):def dispatch (self, request, *args, **kwargs ):print ("请求来之前可以做一些处理" )super ().dispatch(request, *args, **kwargs) print ("请求来之后可以做一些处理" )return ret def get (self, request ):print ("接收到get请求了" )return render(request, "login.html" )def post (self, request ):print ("接收到post请求了" )"name" )"pwd" )if username == "cdc" and password == "123456" :return render(request, "index.html" )else :return HttpResponse("用户名或者密码错误" )
1 2 3 4 5 6 7 8 from django.conf.urls import urlfrom Django视图层 import viewsr"^login/" , views.Login.as_view()),
1 2 3 4 5 6 7 8 9 10 11 12 13 14 15 16 17 18 19 20 21 22 23 24 25 26 27 28 29 30 31 32 33 34 35 36 37 38 39 40 41 42 from django.shortcuts import HttpResponse, renderfrom django.utils.decorators import method_decoratorfrom django.views import Viewimport timedef timer (fn ):def inner (*args, **kwargs ):print (f"执行花费了{time.time() - start} 秒" )return ret return innerclass Login (View ):def dispatch (self, request, *args, **kwargs ):print ("请求来之前可以做一些处理" )super ().dispatch(request, *args, **kwargs) print ("请求来之后可以做一些处理" )return ret @method_decorator(timer ) def get (self, request ):print ("接收到get请求了" )return render(request, "login.html" ) @method_decorator(timer ) def post (self, request ):print ("接收到post请求了" )"name" )"pwd" )if username == "cdc" and password == "123456" :return render(request, "index.html" )else :return HttpResponse("用户名或者密码错误" )
无论是对函数还是对类,有多少个方法就要添加多少个装饰器。换个思路来思考,根据对CBV源码的分析,我们可以知道对于后面的逻辑操作函数,都是从dispatch中映射执行的,也就是说我们可以对dispatch添加装饰器,这样后面能够通过映射执行到的逻辑处理函数就都可以被装饰器作用到了
1 2 3 4 5 6 7 8 9 10 11 12 13 14 15 16 17 18 19 20 21 22 23 24 25 26 27 28 29 30 31 32 33 34 35 36 37 38 39 40 41 from django.shortcuts import HttpResponse, renderfrom django.utils.decorators import method_decoratorfrom django.views import Viewimport timedef timer (fn ):def inner (*args, **kwargs ):print (f"执行花费了{time.time() - start} 秒" )return ret return innerclass Login (View ): @method_decorator(timer ) def dispatch (self, request, *args, **kwargs ):print ("请求来之前可以做一些处理" )super ().dispatch(request, *args, **kwargs) print ("请求来之后可以做一些处理" )return ret def get (self, request ):print ("接收到get请求了" )return render(request, "login.html" )def post (self, request ):print ("接收到post请求了" )"name" )"pwd" )if username == "cdc" and password == "123456" :return render(request, "index.html" )else :return HttpResponse("用户名或者密码错误" )
三、请求对象(HttpRequest) Django将http协议请求报文中的请求行、首部信息、内容抓提封装到了HttpRequest对象中,django会将HttpRequest对象当做参数传给视图函数的第一个参数request,在视图函数中,通过访问该对象的属性便可以提取http协议的请求数据。由于HttpRequest的方法和属性较多,为了方便记忆,我们可以进行简单分组。
3.1、method 1 2 3 4 5 6 7 8 9 10 11 一.HttpRequest .method "GET" 、"POST" .HttpRequest .GET .GET .get ('键' )获取相对应的值.HttpRequest .POST .POST .get ('键' )获取相对应的值.POST .getlist ("hobbies" )获取存有多个值的列表,同理也有HttpRequest.GET .getlist ("键" )
我们以一个用户注册的例子来研究一下具体的使用方法:
1 2 3 4 5 6 7 8 9 10 11 12 13 14 15 16 17 18 19 20 21 22 23 24 25 26 from django.shortcuts import HttpResponse, renderdef register (request ):print (request.method) if request.method == "GET" :print (request.GET) return render(request, "register.html" )elif request.method == "POST" :print (request.POST) "name" )"pwd" )"hobby" )print (name) print (pwd) print (hobby) return HttpResponse("提交成功" )
1 2 3 4 5 6 7 8 from django.conf.urls import urlfrom Django视图层 import viewsr"^register/" , views.register),
1 2 3 4 5 6 7 8 9 10 11 12 13 14 15 16 17 18 19 20 21 22 23 24 25 26 27 28 29 30 31 32 33 34 35 36 37 38 39 <!DOCTYPE html > <html lang ="en" > <head > <meta charset ="UTF-8" > <title > 注册页面</title > </head > <body > <h1 style ="text-align: center" > 欢迎注册</h1 > <form action ="/register/" method ="post" > <p > <label for ="name" > 用户名:</label > <input type ="text" id ="name" placeholder ="请输入昵称" name ="name" > </p > <p > <label for ="pwd" > 密码:</label > <input type ="password" id ="pwd" placeholder ="请输入密码" name ="pwd" > </p > <p > <span > 爱好:</span > <label for ="sing" > 唱</label > <input type ="checkbox" name ="hobby" value ="sing" id ="sing" > <label for ="sing" > 跳</label > <input type ="checkbox" name ="hobby" value ="dance" id ="dance" > <label for ="sing" > rap</label > <input type ="checkbox" name ="hobby" value ="rap" id ="rap" > <label for ="sing" > 篮球</label > <input type ="checkbox" name ="hobby" value ="basketball" id ="basketball" > </p > <p > <input type ="submit" value ="提交" > </p > </form > </body > </html >
补充:我们知道如果前端想要给后端发送数据,可以通过 form表单以post的形式实现,或者使用ajax实现,其实还可以直接将数据添加到请求的 url 中,但是这样就会把数据在页面上暴露,是十分不安全的,但是对于一些不敏感的信息,可以很方便的通过 url 使用 get 请求发送给后端,后端可以直接从url中取值。
1 2 3 # url 使用 ? 和 & 来添加参数,例如 http: # 路由部分是 http: # 所以在路由层还是可以找到对应的视图函数的
1 2 3 4 5 6 7 8 9 10 11 12 13 14 15 16 17 18 19 20 from django.shortcuts import HttpResponse, renderdef get_demo (request ):print (request.method)print (request.path) if request.method == "GET" :print (request.GET) "a" )"b" )"c" )print (a) print (b) print (c) return HttpResponse("OK" )
1 2 3 4 5 6 7 8 from django.conf.urls import urlfrom Django视图层 import viewsr"^test/get/" , views.get_demo),
1 2 # 测试&b =2&c =3&c =4&c =5 进行访问
3.2、body 1 2 3 4 5 6 7 8 9 10 11 12 13 14 15 16 17 18 19 20 一.HttpRequest.bodyPOST 方法提交数据时,数据会被放到请求体中发送给django,django会将接收到的请求体数据存放于HttpRequest.body属性中,因为该属性的值为Bytes类型,所以通常情况下直接处理Bytes、并从中提取有用数据的操作是复杂而繁琐的,好在django会对它做进一步的处理与封装以便我们更为方便地提取数据,比如form 表单来说,提交数据的常用方法为GET与POST POST ',那么在提交表单时,表单内的所有数据都会存放于请求体中,在发送给django后会封装到request.body里,此时django为了方便我们提取数据,会request.body的数据进行进一步的处理,具体如何处理呢,需要从form 表单提交数据的编码格式说起:form 表单对提交的表单数据有两种常用的编码格式,可以通过属性enctype进行设置,如下"application/x-www-form-urlencoded" form 表单上传文件时只能用该编码):enctype="multipart/form-data" form 表单提交数据是按照编码格式1,那么request.body中数据的格式类似于GET方法的数据格式,如上述用户注册示例中,用户填完信息提交数据后,后端输入request.body的结果为b'name=cdc&pwd =123456&hobby=sing&hobby=dance&hobby=rap',此时django会将request.body中的数据提取出来封装到request.POST 中方便我们提取form 表单提交数据是按照编码格式2,那么request.body中数据的格式为b'------WebKitFormBoundaryKtcwuksQltpNprep\r\nContent-Disposition: form -data;......',,此时django会将request.body中的数据提取出来封装到request.POST 中,将上传的文件数据专门提取出来封装到request.FILES属性中form 表单向django提交数据外,还可以采用ajax技术,ajax可以提交的数据格式有:1、编码格式1 2、编码格式2 3、json,当ajax采用POST 方法提交前两种格式的数据时,django的处理方案同上,但是当ajax采用POST 方法提交json格式的数据时,django会将接收到的数据存放于HttpRequest.body,此时需要我们自己对HttpRequest.body属性值做反序列化操作,form 表单POST 上传文件的话,文件数据将包含在HttpRequest.FILES属性中。input type ="file" name="" /> 中name属性的值,而value则为对应的文件数据POST 且提交的<form > 带有enctype="multipart/form-data" 的情况下才会包含数据。否则,FILES 将为一个空的类似于字典的对象。
form表单上传文件示例
1 2 3 4 5 6 7 8 9 10 11 12 13 14 15 16 17 18 19 20 21 22 23 24 25 from django.shortcuts import HttpResponse, renderfrom Django视图层.settings import BASE_DIRimport timeimport osdef upload (request ):if request.method == "POST" :print (request.body)"name" )print (name)"avator" )with open (file_name, "wb" ) as f:for chunk in file_obj.chunks(): return render(request, "upload.html" )
1 2 3 4 5 6 7 8 from django.conf.urls import urlfrom Django视图层 import viewsr"^upload/" , views.upload),
1 2 3 4 5 6 7 8 9 10 11 12 13 14 15 16 17 18 19 20 21 22 23 24 <!DOCTYPE html > <html lang ="en" > <head > <meta charset ="UTF-8" > <title > 上传文件</title > </head > <body > <form action ="/upload/" method ="post" enctype ="multipart/form-data" > <p > <label for ="username" > 姓名:</label > <input type ="text" id ="username" name ="name" > </p > <p > <label for ="avator" > 头像:</label > <input type ="file" id ="avator" name ="avator" > </p > <p > <input type ="submit" value ="上传" > </p > </form > </body > </html >
3.3、path 1 2 3 4 5 6 7 8 9 一.HttpRequest .path .HttpRequest .get_full_path ()"/order/" .get_full_path ()的值为"/order/?name=egon&age=10"
1 2 3 4 5 6 7 8 9 from django.shortcuts import HttpResponse, renderdef path (request ):print (request.path) print (request.get_full_path()) return HttpResponse("ok" )
1 2 3 4 5 6 7 8 from django.conf.urls import urlfrom Django视图层 import viewsr"^test/path" , views.path),
1 2 // 127.0 .0.1 :8000 /test/ path?a=1 &b=2 &c=3
3.4、其他常用属性及方法 1 2 3 4 5 6 7 8 9 10 11 12 13 14 15 16 17 18 19 20 21 22 23 24 25 26 27 28 29 30 31 32 33 34 35 36 37 38 39 40 41 42 43 一.HttpRequest .META "GET" 或"POST" 。1 、将所有字母大写2 、将单词的连接符替换为下划线3 、加上前缀HTTP_。.HttpRequest .COOKIES .HttpRequest .session .HttpRequest .user (用户认证组件下使用).HttpRequest .is_ajax ()'XMLHttpRequest' 。is_ajax () 可以工作。vary_on_headers ('HTTP_X_REQUESTED_WITH' ) 装饰你的视图以让响应能够正确地缓存。
四、响应对象(HttpResponse) 响应对象可以是任何形式的内容,比如一个HTML文件的内容,一个重定向,一个404错误,一个XML文档或者一张图片等等。总之无论视图本身包含什么逻辑,都要返回响应。django中主要的响应方式有三种,俗称响应三件套。
4.1、HttpResponse 括号内直接跟一个字符串作为响应内容。
1 2 3 4 5 6 7 from django.shortcuts import HttpResponsedef index (request ):return HttpResponse("<h1>OK</h1>" )
1 2 3 4 5 6 7 8 from django.conf.urls import urlfrom Django视图层 import viewsr"^index" , views.index),
4.2、render 1 2 3 4 5 6 7 8 9 render (request, template_name[, context])1 、request:用于生成响应的请求对象,固定必须传入的第一个参数2 、template_name:要使用的模板的完整名称,必须传入,render 默认会去templates目录下查找模板文件3 、context:可选参数,可以传入一个字典用来替换模块文件中的变量,模板中的变量名要和传入的字典的键保持一致render 的功能可以总结为:根据给定字典渲染模板文件,并返回一个渲染后的 HttpResponse对象。
1 2 3 4 5 6 7 from django.shortcuts import renderdef index (request ):return render(request, "index.html" , {"name" : "cdc" })
1 2 3 4 5 6 7 8 from django.conf.urls import urlfrom Django视图层 import viewsr"^index" , views.index),
1 2 3 4 5 6 7 8 9 10 11 12 13 14 15 <!DOCTYPE html > <html lang ="en" > <head > <meta charset ="UTF-8" > <title > 首页</title > </head > <body > <h1 style ="text-align: center;color: red" > 欢迎登录</h1 > <p > </p > </body > </html >
4.3、redirect 返回重定向信息
1 2 3 4 5 6 7 8 9 def my_view (request ):return redirect('/some/url/' )def my_view (request ):return redirect('http://www.baidu.com/' )
1 2 3 4 5 6 7 8 9 10 from django.shortcuts import redirectdef index (request ):return render(request, "index.html" ) def login (request ):return redirect("/index/" )
1 2 3 4 5 6 7 8 9 10 from django.conf.urls import urlfrom django.contrib import adminfrom Django视图层 import viewsr"^index" , views.index),r"^login" , views.login),
重定向的实质
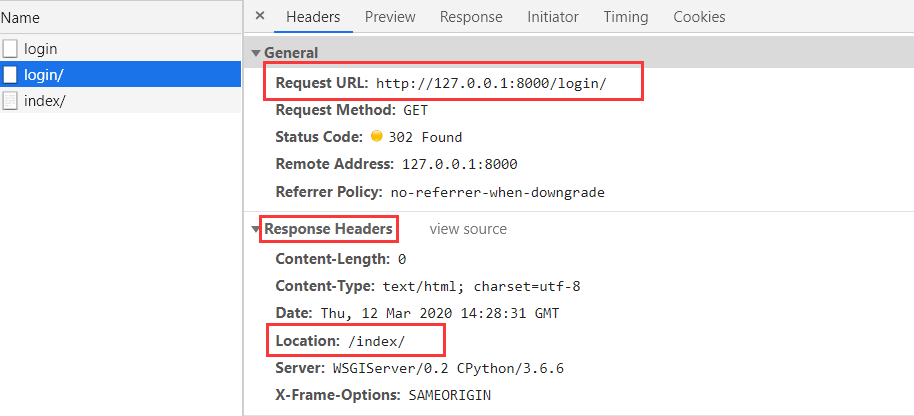
首先浏览器访问的是 http://127.0.0.1:8000/login/,请求到达相关的视图后,跳转到 “/index/“,而对于浏览器而言,实际上的做的事情是再访问一下http://127.0.0.1:8000/index/
重定向状态码
1 2 3 4 5 6 7 8 9 10 11 12 13 一、301 和302 的异同。1 、相同之处:301 和302 状态码都表示重定向,具体点说就是浏览器在拿到服务器返回的这个状态码后会自动跳转到一个新的URL地址(浏览器会从响应头Location中获取新地址),用户看到的效果都是输入地址A 后瞬间跳转到了另一个地址B 2 、不同之处:301 表示旧地址A 的资源已经被永久地移除了,即这个资源不可访问了。搜索引擎在抓取新内容的同时也将旧的网址转换为重定向之后的地址;302 表示旧地址A 的资源还在,即这个资源仍然可以访问,这个重定向只是临时地从旧地址A 跳转到地址B ,搜索引擎会抓取新的内容、并且会保存旧的网址。 从SEO层面考虑,302 要好于301 1 、网站调整(如改变网页目录结构);2 、网页被移到一个新地址;3 、网页扩展名改变(如应用需要把.php 改成.Html 或.shtml )。404 页面错误信息,访问流量白白丧失;再者某些注册了多个域名的网站,也需要通过重定向让访问这些域名的用户自动跳转到主站点等。
五、JsonResponse 用于后端向前端返回 json 格式的数据
1 2 3 4 5 6 import jsondef my_view (request ):'egon' ,'kevin' ]return HttpResponse(json.dumps(data) )
1 2 3 4 5 6 7 8 from django.http import JsonResponsedef my_view (request ):'egon' ,'kevin' ]return JsonResponse(data,safe=False )